

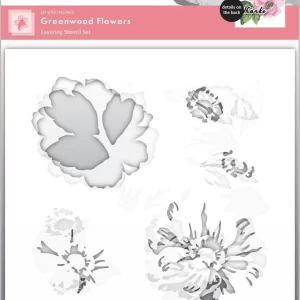
Bring beautiful blossoming wildflowers to the page with this one-of-a-kind layering stencil set!
Altenew is here to take the ‘layering’ concept to another level with the introduction of Simple Layering Stencils. With a few simple steps, you will now get gorgeous layering images with very little effort.
The Altenew Hill Blossoms Simple Layering Stencil Set features a bunch of small wildflowers that you can layer with your favorite ink colors. Stencil 1 has all the cut-outs for the layers of the flowers, and Stencil 2 has the cut-outs for the two layers of the leaves and branches. You may apply color to either stencil first, and follow it up with the other. We recommend starting with the lightest base layer and then moving up to darker shades.
This stencil set is easy to use, and you will be able to create beautiful projects in no time!
Stencils are a great tool to use in paper crafts and journals to add design elements, create patterns, and add interest to your projects.
Stencils can be a useful tool in crafts for a variety of reasons:
Consistency: Using stencils ensures that your designs will be consistent and uniform. This can be especially important if you are creating a repeated pattern or design.
Precision: Stencils allow for precise placement of your design. This is particularly useful when working with intricate or detailed designs that require accuracy.
Time-saving: Using a stencil can save time, as it eliminates the need for you to draw the design freehand. This is especially useful if you need to create multiple copies of the same design.
Versatility: Stencils can be used on a variety of surfaces, including paper, fabric, wood, and walls. This makes them a versatile tool for a wide range of crafting projects.
Creativity: Stencils can also be used as a starting point for your creativity. You can use them to create a base design and then add your own personal touches to make it unique.
Here are some steps to use stencils in your crafting:
- Choose your stencil: Choose a stencil that fits the design you want to create. Stencils come in various shapes and sizes, so select the right one for your project.
- Prepare your surface: Make sure your surface is clean and dry before you begin. This will help ensure that the stencil adheres properly.
- Position your stencil: Position the stencil on your surface where you want the design to be. You can use tape or adhesive to hold it in place.
- Apply the medium: Use a brush, sponge, or other applicator to apply your chosen medium through the stencil onto the surface. This can be paint, ink, or any other medium you choose.
- Remove the stencil: Carefully remove the stencil from the surface while the medium is still wet. This will help ensure that the lines are clean and sharp.
- Clean the stencil: After using the stencil, clean it with soap and water or according to the manufacturer’s instructions.
- Repeat as necessary: If you want to create a pattern or design that repeats, you can reposition the stencil and repeat the process.
Stencils can be used on a variety of surfaces, such as paper, fabric, wood, and more. They are a great way to add interest and texture to your crafting projects. With a little practice, you can use stencils to create beautiful and unique designs on a variety of surfaces.